This is the third article in the StoneFly Storage Concentrator™ Series. The series was created to help users understand how to use the StoneFly’s virtual storage appliance SCVM™ and how it can help storage administrators manage system operations. This article will explain how users can expand volumes in SAN. It will cover the different methods that users can use to expand SAN volumes like by Campus Mirror image, Asynchronous Mirror Image, and Snap-Enabled Live Volume. The previous article in the series discussed how to configure and copy volumes in SAN.
Expanding a Volume
To increase the size of a volume after it is created : 1. Navigate to SAN > Volumes 2. Click on Configure Volume 3. Click Expand Volume. The Expand Volume screen should appear (like shown below).
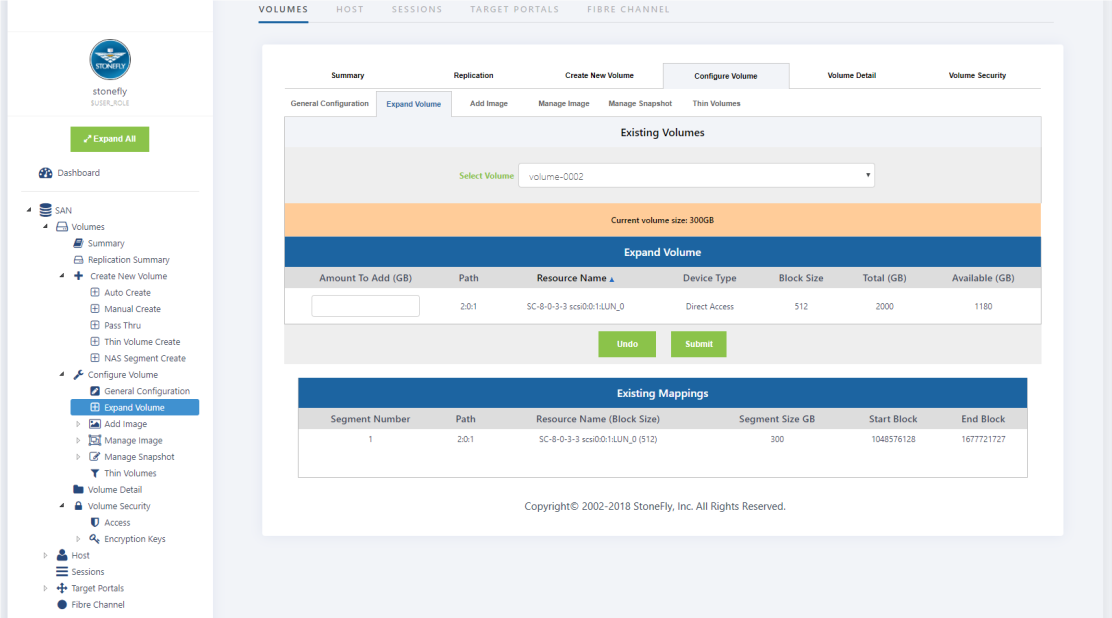
1. Select the volume you wish to expand from the drop down menu. All available resources are shown. Encrypted volumes appear on the dropdown list along with the non-encrypted volumes. 2. Enter the desired expansion amount in GigaBytes. The minimum expansion amount is 1 GB. The maximum size is equal to the Available GBs. You do not need to expand volumes symmetrically; however, you must expand all images simultaneously in mirror volumes. You may select space from one resource or expand multiple resources to reach the desired expansion amount. On the Host Server (Microsoft Windows): 1. Go to Disk Management. 2. From the top menu, select Rescan Disks and you should see the extra blank unallocated space beside your partition. 3. If you have Windows Server 2003, use the diskpart command to expand your partition to include the extra disk space. 4. If you have Windows Server 2008 or later, convert the disk to “Dynamic disk”. The Microsoft Initiator does not support dynamic disks in Server 2003, but it does for Server 2008. Check the Microsoft Initiator release notes for more information. 5. Right click on the original partition and expand/extend it to include the extra disk space. All images in a Mirror Volume must be expanded symmetrically and simultaneously. For more information on Mirror Volumes, see “StoneFly Mirroring”. Do not attempt to expand a Campus Mirror image or a Snapshot. Follow the procedure below for expanding a Campus Mirror image. Expanding a Snapshot is not possible but you may expand the Snapshot Live Volume and the Snapspace. 4 Click Submit to expand the volume.
Expanding a Volume with Campus Mirror Image
To expand a volume with a Campus Mirror image, you must follow the following steps: 1 Expand the volume used as the Campus Mirror image on the Secondary Storage Concentrator. 2 Rediscover the volume on the Primary Storage Concentrator. Verify its size. 3 Go to the “Expand Volume” GUI page on the Primary Storage Concentrator and execute the expansion.
Expanding a Volume with Asynchronous Mirror Image
To expand a volume with an Asynchronous Mirror image, you must follow the following steps: 1 Expand the volumes used as the Asynchronous Mirror image on the Remote Storage Concentrator. 2 Rediscover the volume on the Primary Storage Concentrator. Verify its size. 3 Go to the “Expand Volume” GUI page on the Primary Storage Concentrator and execute the expansion.
Expanding a Snap-enabled Live Volume
1 Select the volume you wish to expand from the drop down menu. All available resources are shown. 2 Enter the desired expansion amount in GigaBytes. The minimum expansion amount is 1 GB. The maximum size is equal to the available GBs. 3 If after expanding the volume you wish to expand the Snapspace as well, repeat the procedure for the Snapspace. 4 After the expansion is complete, you may resume taking storage snapshots.
Expanding the Snapspace for a Snap-enabled Live Volume
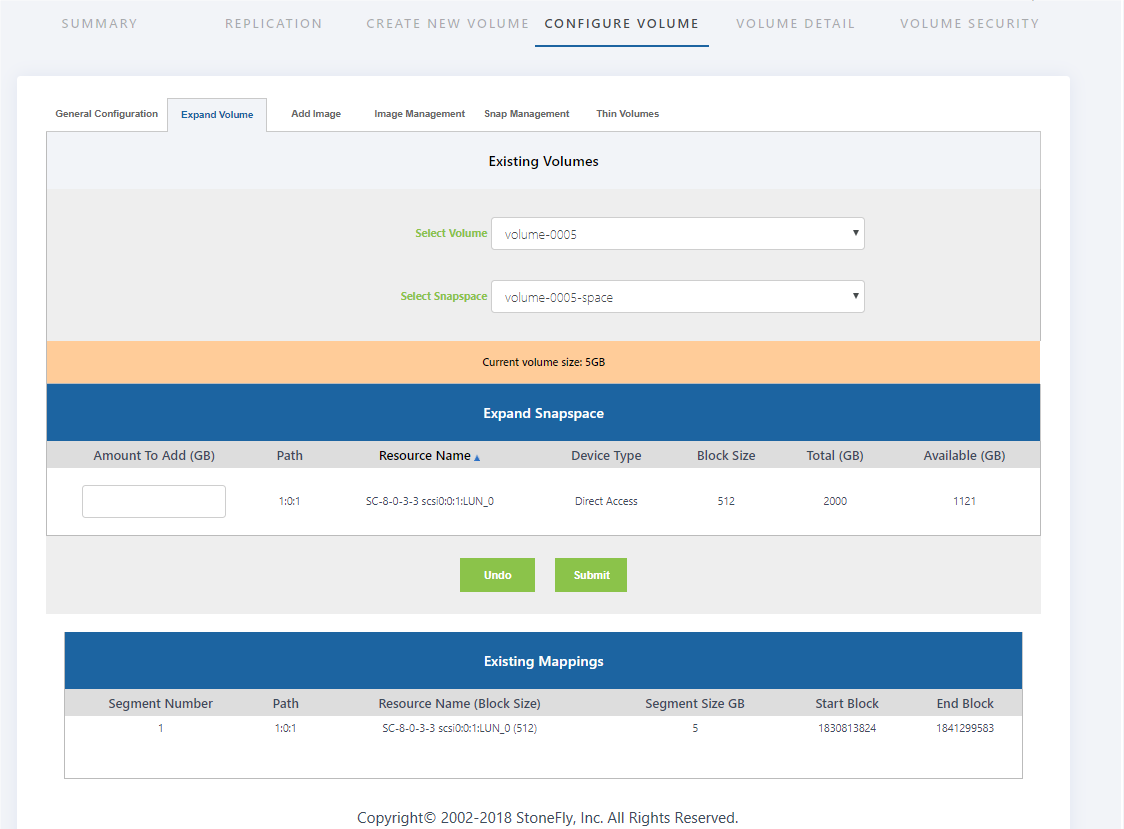
1 An additional feature has been added that allows a user to expand the amount of the Snapspace assigned to a Snap-enabled Live Volume through the Volume Expansion menu. This feature is most useful for adjusting the space needed to hold changes in Asynchronous Mirrors. 2 Navigate to the Expansion page. Select the Snap-enabled volume from the drop down menu and select the Snapspace volume you wish to expand. Note that only the Snapspace appears on the list. The size indicated is the size of the Snapspace. (See image below) 3 The menu allows the amount of expansion to be entered for a specific resource. Enter the amount in the text box to the left of the desired Resource. 4 Click Submit. The size of the Snapspace is automatically increased.
")
")